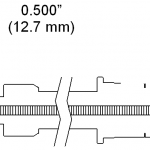
Step 1: Remove the consumables from the neck.At the rear of the neck, insert the wire brake jump liner.Push the jump liner forward until it mates with the back end of the neck. At the front, cut to a 1/2″ (12 to 13 mm) stick-out. Step 2: Insert the liner through the rear of the [...]
Replace Your Liner in Less Than 1/2 the Time with the QUICK LOAD® Liner from Tregaskiss! To convert to the QUICK LOAD Liner, update your conventional liner part number as per the chart below. QUICK LOAD Liner Conversion Chart Wire SizeQUICK LOAD LinerReplaces Conventional LinerDescriptionLengthI.D.0.023″415-23-15Q415-23-15High Carbon Steel – Round Wound16.5′0.050″0.030″415-30-6Q415-30-6High Carbon Steel – Round Wound7.5′0.062″0.030″415-30-15Q415-30-15High [...]

NOTICE: This product is factory set for wire equal to or smaller than 0.045“. If you are using wire 0.052” and larger, please remove the wire guide within the neck housing and replace it with the larger size (part #598-116) that is supplied in the box with this product. Removal and Installation Instructions Follow the [...]
TOUGH LOCK® retaining heads featuring dual taper technology have a second taper at the rear of the retaining head where it connects with the neck. This dual taper design: Locks your gun from contact tip to neckIncreases electrical conductivityHelps keep your consumables running coolerDecreases costly downtime To enjoy the benefits of TOUGH LOCK retaining heads at no [...]
Step 1: Insert the bronze jump liner (part #495-18-25) into the neck.Position the liner stop flush with the back of the neck copper.Cut the liner 1/2 inch from the consumable side of the neck. Step 2: Insert the Teflon liner into the torch until it stops.Measure from the end of the power pin to the [...]
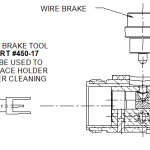
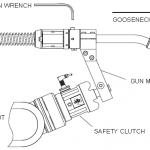
Wire Brake Tool #450-17 Instructions Remove Wire Brake.Slide the Wire Guide Holder out of the connector cone assembly.Clean any debris or residue on the Wire Guide Holder. To Reassemble the Wire Guide Holder Line up the Wire Brake Tool with the Wire Guide Holder as shown in the diagram.Slide the Wire Guide Holder back inside [...]
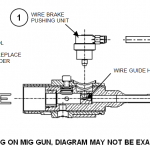
Wire Brake Tool #450-17 Instructions Remove the neck and consumables (not shown in the diagram).Remove (unthread) the Wire Brake Pushing Unit.Using the Wire Brake Tool, slide the Wire Guide Holder out of the connector cone assembly.Clean any debris or residue on the Wire Guide Holder. To Reassemble the Wire Guide Holder Using the Wire Brake [...]
AIR BLAST KIT 508-A (does not include housing) Remove 408-200-9A using a standard screwdriver Remove 408-200-8A using a standard screwdriver Thread 410-45-2 into 408-200-8A using xx wrench Insert TR-2237 into push-lock connections of TR-2232 and 410-45-2. Insert TR-2232 into air supply, 60-80 psi air pressure 408-200-9A 408-200-8A (internal threads) 410-45-2 TR-2232
The sprayer should be installed within the weld cell at a convenient location. Be sure to consider movable fixtures and the confines of the robot. Each sprayer comes complete with all required installation hardware and mounting brackets.

The TOUGH GUN® Reamer has all the necessary mounting holes for installation of the SR-500 spray unit. Remove the plug from the side of the frame detail and replace with the supplied bulkhead fitting.Attach the spray head bracket to the TOUGH GUN Reamer using the two (2) screws provided.Attach the spray head to the TOUGH [...]
WARNING: Ensure the power supply is off and disconnected before proceeding! Mounting the Wire Cutter The Wire Cutter should be installed within the weld cell. The base plate has been designed for mounting on top of the TOUGH GUN™ Reamer. Be sure to consider movable fixtures and the confines of the robot. Attach the Wire Cutter [...]
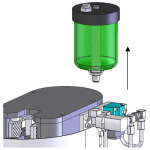
Step 1: It is best to start by establishing the pail/drum location. This way it will be easier to run the lines and permanently secure them.Start by removing the reservoir from the spray unit.NOTE: Shut the vent cap (if applicable) and turn the reservoir upside down when it comes off the spray unit to avoid [...]
WARNING: Ensure the power supply is off and disconnected before proceeding! Mounting the TOUGH GUN® Reamer The TOUGH GUN Reamer should be installed within the weld cell at a convenient location. Be sure to consider movable fixtures and the working envelope of the robot.Affix the TOUGH GUN Reamer base to a sturdy platform using the four [...]
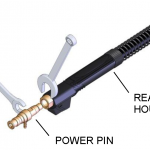
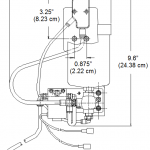
Thread the power pin into the rear housing.Tighten the power pin into the rear housing using a 1-inch (2.54 cm) wrench on the rear housing and a 3/4-inch (19 mm) wrench on the power pin. Torque to 18 ft.-lbs. (24.4Nm).IMPORTANT: The thread-in two-piece power pin has a taper to seat and lock the power pin [...]
IMPORTANT: TCP will be different from standard TOUGH LOCK® consumables. Removal and Replacement Nozzle Pull slip-on nozzles off with a twisting motion.When installing the nozzle, ensure that it is fully seated. Contact Tip Thread the contact tip into the retaining head.Torque to 30 in.-lbs. (3.5Nm).The Tregaskiss Tip Tool (part #450-18, for heavy duty tips) or [...]
IMPORTANT: Neck Insulator MUST be in place before welding to properly insulate the neck armor.Check all parts to ensure that connections are tight before welding.The heavy duty retaining head MUST be tightened with a 5/8 inch (16 mm) wrench to prevent the contact tip from overheating.DO NOT use pliers to remove or tighten the retaining [...]
NOTE: For MIG guns equipped with ‘Direct Plug-Ins’, Bernard®, or Euro connector, the procedure is the same. On Miller® style guns, the liner is held captive by a guide cap which must be removed and replaced when changing the liner. Step 1: NOTE: Ensure the power supply is off and the gun is removed from [...]
IMPORTANT NOTE: Initial installation instructions are different from replacement instructions. FOR INITIAL INSTALLATION ONLY — Remove the protective cap from the QUICK LOAD™ Liner. Install this liner from the back of the MIG gun with retainer attached (using the same procedure as installing a conventional liner). Future replacements will be done from the front. IMPORTANT: Push liner back [...]
Remove the rear cap of the power pin. Insert the brass end of the liner into the liner retainer until it is firmly seated. Insert the non-brass end of the QUICK LOAD™ Liner into the back of the MIG gun and push through until it emerges from the front of the MIG gun and the [...]
To change a conventional liner on a TOUGH GUN® robotic MIG gun equipped with wire brake, follow the instructions below: Step 1: Unthread and remove the liner from the back of the MIG gun. Step 2: Insert the new liner from the back of the torch. The liner will bottom out on the Wire Brake.Measure [...]
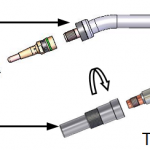
Neck Removal Remove consumables. (Refer to Fig.1)Twist the hand nut clockwise. (Refer to Fig. 2)Hold the hand nut in the unlocked position while pulling the neck from the gun.Release the hand nut. It will return to the locked position. (Refer to Fig. 3) Neck Replacement NOTE: Remove consumables (retaining head, nozzle and contact tip) before installing [...]
NOTE: The following instructions are for G-405. Other fixtures are similar. Step 1: Remove consumables; nozzle, retaining head and neck insulator (with the exception of TOUGH GUN I.C.E.® components).Install the gauge point into the neck. Step 2: Slide the neck completely into the datum block, aligning keys on the neck to the keyway in the [...]
NOTE: There is a protective ring that must be rotated to expose the neck set screw. Step 1: Using a 5 mm Allen wrench, loosen the screw 1/4 turn to remove the neck.Pull the neck directly out of the connector cone assembly. Step 2: Insert the replacement neck into the gun housing, ensuring the key [...]
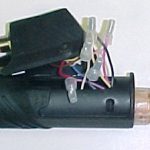
Unicable Repair Kit Part #513-7 Remove the liner from the MIG gun.Remove the screws from the base of the terminal housing. Remove the terminal housing and move the handle backDisconnect the cable leads from the Euro butt connectors.Move the Euro hand nut and spacer out of the way. Be careful not to strip the lead [...]