
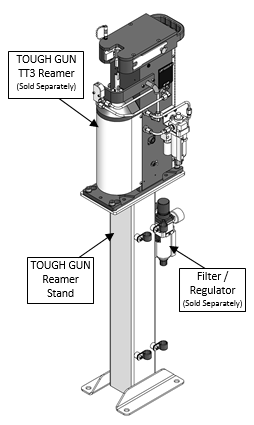
How To Install the TOUGH GUN Reamer Stand
- Unpack the TOUGH GUN® reamer stand and inspect for any damage ensuring that there are no bent, corroded, or missing parts.
- Confirm that the stand has been manufactured to the correct height. The stand can be ordered in any of the heights shown in the table below:
| Part Number | Width (in.) | Part Number | Width (in.) | Part Number | Width (in.) |
|---|---|---|---|---|---|
| RST-18 | 18″ | RST-28 | 28″ | RST-38 | 38″ |
| RST-19 | 19″ | RST-29 | 29″ | RST-39 | 39″ |
| RST-20 | 20″ | RST-30 | 30″ | RST-40 | 40″ |
| RST-21 | 21″ | RST-31 | 31″ | RST-41 | 41″ |
| RST-22 | 22″ | RST-32 | 32″ | RST-42 | 42″ |
| RST-23 | 23″ | RST-33 | 33″ | RST-43 | 43″ |
| RST-24 | 24″ | RST-34 | 34″ | RST-44 | 44″ |
| RST-25 | 25″ | RST-35 | 35″ | RST-45 | 45″ |
| RST-26 | 26″ | RST-36 | 36″ | ||
| RST-27 | 27″ | RST-37 | 37″ |
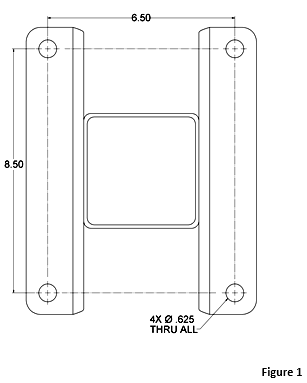
- The stand is to be securely fastened to the floor / fixture through the two angle iron feet. The bolt pattern for the holes is detailed in Figure 1 (all dimensions are measured in inches).
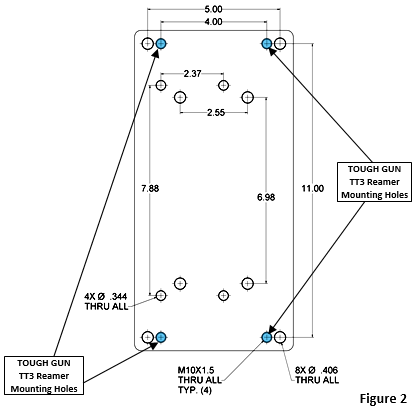
- Once securely fastened to the floor / fixture, the TOUGH GUN Reamer can be mounted to the top plate. The stand can accommodate other reamers by using the other untapped holes in the top plate. The highlighted holes shown in Figure 2 are for all TOUGH GUN TT3 Reamer units (analog and Ethernet models) – all dimensions are measured in inches.
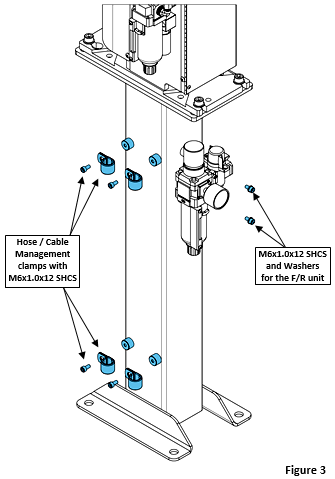
Once the TOUGH GUN TT3 Reamer is mounted securely to the Reamer Stand, the hose / cable management clamps (included) can be secured to the side of the stand where necessary. If the unit is equipped with a Filter / Regulator (F/R), use the included M6x1.0x12mm SHCS and washers to fasten it to the stand. Mounting points indicated in Figure 3.
INS114 06/2016