Maintain Your MIG Gun
Simple Tips for Getting the Most from your MIG Equipment

Time spent maintaining a MIG gun can be considered downtime, but that doesn’t mean it is time wasted. Proper gun maintenance can substantially extend the service life of the equipment and reduce the even greater cost of weld rework. Diagnosing and correcting minor problems, such as loose connections, can avert more serious equipment failures and weld defects.
Below are some recommended maintenance tips for most brands of MIG guns. Always follow the gun manufacturers recommended safety precautions, including disconnecting the gun from the feeder and allowing it to cool before performing any maintenance that could expose live electrical circuits.
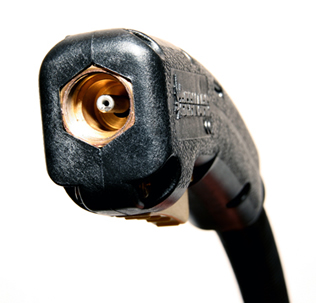
Feeder Connection – A loose or dirty wire feeder connection often causes electrical resistance and heat to build up at the point of the connection, leading to drops in voltage, an erratic arc and premature equipment failure. You should manually check the connection on a weekly basis or whenever you install the gun to the feeder to ensure that it is clean and fits tightly to the wire feeder. If the connection is loose and cannot be tightened according to the manufacturer’s specifications, it is best to replace the direct plug with one that fits securely. Clean a dirty direct plug as needed with electrical contact cleaner.
Another area of the feeder connection that can fail are the O-rings that provide an airtight seal through which the shielding gas enters the cable hose. These O-rings can become dry and crack over time, and they can also be cut or damaged when the gun is installed. Gas leaks caused by faulty O-rings can cause porosity, excessive spatter and create other defects that require rework and waste gas. They should be checked and coated with a silicone lubricant whenever the gun is removed from the feeder.
Cable – The cable is usually the only part of the MIG gun that requires full gun replacement when it becomes damaged. For that reason, cable maintenance is very important to avoiding unnecessary equipment costs. Gun cables should be visually inspected on a daily basis for cuts, kinks and other damage. Cuts in the cable could expose the internal copper wiring and create a potential safety hazard.
The cable should also be routed from the feeder to the welding location as straight as possible. Severe bends in the cable can obstruct the gas flow and wire feeding, leading to porosity, an erratic arc and other weld deformities that take valuable time to remedy.
Liner – The liner is often both the most difficult part of the gun to inspect and maintain, and one of the most frequent sources of weld troubles. Fragments of the welding wire often chip off and accumulate as it travels through the liner. Over time, these accumulations can cause poor wire feeding, birdnesting and burnback. These problems can also occur if the liner becomes kinked or if the cable is bent at too much of an angle.

Removing the liner for a full inspection and cleaning it is time consuming and unnecessary if there aren’t any existing problems. Instead, to maintain an unclogged liner, use compressed air to clear out any potential blockages during wire changeovers or whenever you remove the wire from the gun. Spending an extra few minutes clearing out any debris from the liner can save considerably more time than troubleshooting the weld defects and equipment problems that can result from blockages.
Handle and Trigger – The handle and trigger generally require very little maintenance beyond visual inspection. Check that there are no missing screws or damage to the handle and test the trigger to make sure it is not sticking or otherwise malfunctioning. These inspections take only seconds and should be done every time you use the gun.
A damaged handle runs the risk of causing electrical shock if there is any exposed copper from the weld cable. A dirty, damaged or simply worn out trigger can cause a number of weld problems and should be replaced with a new trigger.
Neck – The neck carries the electrical current from the welding cable to the consumables. Loose connections at either end of it can cause poor electrical conductivity, which can lead to weld defects and further equipment failures due to the heat generated by electrical resistance. Check to ensure tight neck connections on a daily basis.
MIG gun necks also feature external insulators that protect the electrically live components from being exposed. Exposed electrical components near the handle can create a safety risk, and exposed components near the consumables could arc to the work piece and damage both the gun and the work piece. The insulators should be checked on at least a weekly basis and replaced as needed.
Consumables – Because of their exposure to heat, spatter and general abuse, the consumables require frequent replacement. That doesn’t mean, however, that you can’t save time and money through some simple maintenance.

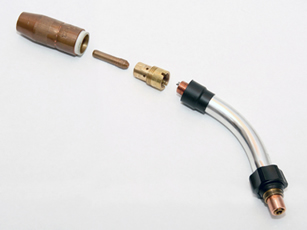
In addition to providing gas flow to the weld pool, the gas diffuser connects to the neck and carries the electrical current to the contact tip. Loose connections between the diffuser and the neck or the diffuser and the contact tip can cause gas leaks or weld quality and equipment problems related to poor conductivity and built up electrical resistance. These should be checked during nozzle changes and tightened to the manufacturer’s specifications using the recommended tools.
Most diffusers also use O-rings to seal in the shielding gas, and like their counterparts at the back end of the gun, you should check these for cracks, cuts or other damage and replace them as necessary whenever you remove the nozzle.
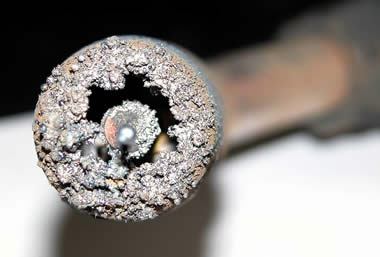
The nozzle’s main role is to focus the shielding gas around the weld pool. Spatter can build up inside the nozzle and obstruct the gas flow, resulting in porosity, excessive spatter and other problems related to inadequate shielding gas coverage. The nozzle and nozzle insulator can also become damaged from cleaning out the built-up spatter.
Depending on the amount of spatter created while welding, you should check and clean the nozzle several times per day. A pair of welding pliers is the most common tool for cleaning nozzles, but there are other specialized tools designed specifically for reaming out spatter from the nozzles.

The nozzle insulator keeps the copper or brass nozzle body separate from the electrically live consumable components, so a damaged insulator could cause the nozzle to arc to the workpiece. A visual inspection of the nozzle insulator is usually sufficient to determine proper condition, and damaged insulators require replacing the entire nozzle.
The contact tip is the final piece of the consumables set, and the last point of contact between the welding equipment and the welding wire. As the wire passes through the contact tip, it can erode the inside of the tip bore, leading to interruptions in the electrical current and poor arc control. The tip can also become covered with spatter and cause inadequate gas coverage.
Welding operators often wait to change the contact tip until a weld problem develops, however, the time it takes to correct a weld problem can be considerably greater than the time it takes to visually inspect and replace the contact tip on a regular basis as a standard maintenance procedure.
Industrial grade welding equipment is built with productivity in mind, but even the best equipment will eventually breakdown. Whether you catch the equipment malfunction in its early stages or after serious problems develop is up to you, however. Through the implementation of the simple, proactive maintenance steps outlined above, you can greatly extend the service life of your equipment and avoid the costly correction of weld defects in the event of equipment breakdown.


