
Making Your MIG Gun Consumables Last
Simple Ways to Save Money, Improve Weld Quality and Minimize Downtime
Even though many consider MIG gun consumables to be a commodity—a simple ‘throw-away’ item—these components play a critical role in achieving good welding performance and quality. They can also impact the overall productivity and cost of your welding operation, often in some rather subtle ways. For both reasons, it is crucial to find the best possible, longest lasting consumables for your application and maintain them with as much care as you would any other welding equipment.
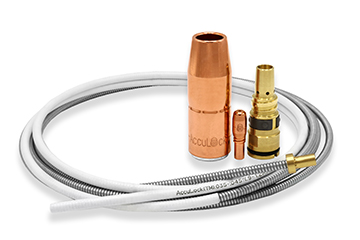
be certain that the connections between the retaining head, contact tip and nozzle are secure.
MIG gun consumables, which comprise the front-end part of the gun—the nozzle, retaining head and contact tip—plus the liner, are at the heart of the welding process. These components are responsible for properly feeding the welding wire and for establishing the electrical conductivity necessary to create the arc. And while the welding power source you use undoubtedly influences your operation’s performance, so too can your consumables. In fact, MIG gun consumables are one of the most overlooked portions of the welding operation. Without proper installation, storage and maintenance, these components can cause significant downtime for changeover and added cost for inventory, waste and rework.
Fortunately, through a few simple measures, you can easily extend the life of these components and positively affect the efficiency and profit of your welding operation. Here’s how.
In the MIG welding process, the nozzle directs the shielding gas around the welding wire and arc to the weld puddle. Its purpose is to protect the weld from the atmosphere and/or other contaminants that can cause weld defects, such as porosity, that can lead to costly rework. Unfortunately, due to its proximity to the weld puddle, the nozzle is a common source of spatter accumulation that can obstruct that shielding gas flow.
Start at the Beginning
To prevent such issues, first consider the nozzle itself. Look for a smooth, non-porous surface that is free of sharp edges or flat surfaces, as it better resists spatter accumulation and therefore, lasts longer. Also, choose nozzles that have some ‘mass’ to them—they should look and feel sturdy. These heavier nozzles may cost more up front, but their longevity can help prevent downtime that will likely cost you more money over time.
Proper nozzle storage and handling is critical to extending the life of this component. First, keep the nozzle in the plastic packaging in which it shipped until you are ready to use it. Unwrapping the nozzle and storing it in a bin, while a common practice, causes dents and scratches on the surface of the nozzle, making it more prone to spatter accumulation. Nozzles that are unprotected from the environment can also accumulate air-borne contaminants or debris, which if introduced into the weld puddle may cause defects that need to be reworked.
Generally, semi-automatic MIG gun applications use slip-on nozzles. When installing one, make certain to securely connect the nozzle to the retaining head to prevent shielding gas leaks that can lead to weld quality issues. Also, be mindful whether you have any debris, grease or oil on your hands or gloves. Keep the nozzle as clean as possible to prevent such contaminants from entering the weld puddle later on or causing premature failure of the component.
Consider using an anti-spatter compound (gels are commonly used in semi-automatic applications) to reduce the amount of spatter that adheres to the nozzle. Apply the compound by dipping only the front inch and a half of the nozzle into the compound. Do not submerge the nozzle in the compound, as this can saturate the porous insulator inside the nozzle, causing it to fail prematurely, accumulate spatter more readily and/or create an erratic arc—all factors that lead to downtime, extra costs and waste associated with changing over to a new nozzle.
Next, visually inspect the inside and outside of the nozzle periodically for spatter, ideally several times throughout the welding shift. If it appears clogged, clean the nozzle using a tool specifically for the job or replace it if necessary.
Finally, never use the nozzle to chip away at spatter or for any other hammering purpose. Doing so damages not only the MIG gun, but it also can dent or misshape the nozzle, rendering it unusable.
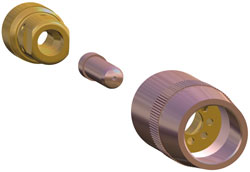
Keep Connected
Good welding performance depends on good electrical conductivity. Look for consumables with a tapered design that locks conductive parts — like the contact tip, gas diffuser and MIG gun neck — together. This is particularly important since the gas diffuser is the component that forms the connection between the nozzle and the MIG gun neck, and holds the contact tip in place. It also provides the surface area necessary to carry the electrical current to the contact tip to create an arc. If the connection between the gas diffuser and contact tip is not secure, it can cause electrical resistance that leads to overheating, causing the components to fail.
To ensure your arc remains stable and that the contact tip does not become too hot, use the correct diameter contact tip for your welding wire. Also, look for a contact tip design that buries the tip further into the gas diffuser, as this keeps the tip away from the heat and allows the shielding gas to cool the contact tip tail — keeping the contact tip running cooler for a longer life.
Similar to nozzles, store and handle the contact tip and retaining head properly. Keep them in their packages until you are ready to use them and take care that they are free of contaminants. For instance, any oil or debris present on a contact tip can become trapped when you thread the tip into the retaining head, which in turn can cause the components to overheat and fail during the welding process.
When installing a retaining head, tighten the component to the manufacturer’s specifications by hand or by using a recommended tool. This step ensures a secure connection between the retaining head and the MIG gun neck and prevents shielding gas leaks and/or electrical resistance. Similarly, when installing the contact tip tighten the components securely using a pair of welding pliers (sometimes called welpers). Do not use wire cutters, as these can cause scratches in the contact tip or misshape it entirely—any such damage shortens the tip’s life and may lead to costly downtime and rework. Contact tips with coarse threads are a good option to speed replacement since they require fewer turns, and this design helps minimize the opportunity for cross-threading. One full turn disengages the contact tip from the diffuser.
Line Up
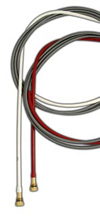
A MIG gun liner spans the length from the front of the MIG gun through to the power pin and is the conduit through which the welding wire feeds. It is generally composed of a steel coil, but if you are welding with aluminum wire you’ll need to choose a nylon liner or one of similar material. As when choosing your contact tip, select the correct diameter liner for your welding wire to prevent wire-feeding, arc wandering or other problems like bird nesting. Bird nesting occurs when the welding wire becomes tangled in the drive rolls; it is also caused by an improperly installed liner and/or by using the wrong drive roll tension.
Properly trimming your MIG gun liner significantly increases the longevity of this component. Always follow the manufacturer’s recommendations, using the proper cutting tools and trimming the liner to the correct length. A good way to achieve error-proof liner installation is to use a consumable system that eliminates the need to measure the liner and with it the potential to trim it incorrectly. These liners load through the neck at the front of the gun, are locked in place and trimmed flush with the power pin at the back of the gun.
Liners like these are very helpful, as cutting the liner too short causes the welding wire to feed improperly through the contact tip, resulting in wire chatter, an erratic arc and the potential for burnbacks. Conversely, a liner that is trimmed too long can kink, which leads to feeding issues and, again, shortens the life of the contact tip.
When installing your MIG gun liner, keep it (as much as possible) away from contaminants, as debris causes blockages that lead to feeding problems and welding wire damage. Do not let the liner drag on the floor, but instead wrap it in a coil in one hand as you install it, and make certain that your hands or gloves are clean. The frequency with which you need to change your MIG gun liner depends largely on the welding application, the type of welding wire used, the duration of welding and the amperage. Consider tracking the length of time from one installation to another, using that timeframe as a guideline for how long your liner will likely last. Some welding operators also blow compressed air through the liner periodically to extend the component’s life.
Other means to increase the life of your MIG gun liner include using the shortest MIG gun cable length possible for your particular welding application and keeping the cable clear of any equipment, such as a forklift, that could damage it. Both measures help prevent kinking and again minimize the chance of poor wire feeding that could lead to costly downtime.
A Final Word
While MIG gun components comprise just one portion of your welding operation, being mindful of the impact they have on quality and cost is important. Nozzles, contact tips, retaining heads and liners each perform a function vital to the whole of the welding process and should be purchased, installed and maintained with care. Doing so not only prevents the cost of downtime for changeover, maintaining excessive inventory and rework, but it can affect your bottom line—positively—through better weld quality and greater productivity.